I highly recommend checking out the Big Guide 1 before looking at this blog! 😉
Required Materials:
- Arduino Uno (Arduino Nano, Arduino Mega etc.)
- Breadboard
- 16×2 LCD Screen (Green or Blue) 😄
- Assorted Men-Male Jumper Cable
- 10KΩ Potentiometer (For backlight counter, optional)
- 220RΩ (We will use in the examples)
LCD and Arduino Connections
The diagram of the pins on the LCD we use is as follows. We have 16 pins on our LCD screen. Depending on the screen we are going to use, the pins can be on the top, bottom, or both sides of the screen. Some very rare screens have 14 pins because there is no backlighting light. Pins 15 and 16 are used to light up the backlight on displays with display lighting. The backlights are separate from the LCD, so we can use the pin of the backlight by plugging it into a digital port. The connections from each pin to the Arduino will be the same, but it can arrange differently you can pins via the LCD. You can look at the LCD’s datasheet for this.
Warning: You may need to solder a 16-pin cap to your LCD before connecting it to the breadboard. Follow the diagram below to connect the LCD to your Arduino:

If you want, you can not use the potentiometer, we can adjust the contrast of the backlight with the potentiometer, but if you do not want, you can use the backlight by giving the V0 pin 5 volts directly. If you’d like to see the diagram more clearly, click here.
Programming in Arduino IDE
All the codes we will see are the LiquidCrystal library that comes with the Arduino IDE. We will try many features with this library, of course. Since it is a giant guide, we cannot pass without telling the LiquidCrystal library. 🙂 Now I seem to hear you say, “What is this LiquidCrystal library?” 😄 Let me tell you right away.
What is the LiquidCrystal Library?
Allows communication with LiquidCrystal displays (LCDs). I recognized this library as the way an Arduino/Genuino board controls LiquidCrystal displays (i.e. LCDs) based on the Hitachi HD44780 compatible chipset found in most text-based LCDs. The library runs in 4 or 8 bit mode. You can download the latest version from the GitHub repo by clicking here.
LCD Display Options
The LiquidCrystal library has 19 different functions that we can use. These functions include changing the position of the type, scrolling the text across the screen, or turning the image on or off. Now let’s learn these functions one by one:
Arduino LCD Commands
LiquidCrystal( )
Its task specifies the pins that the Arduino uses to connect to the LCD. We can use a random one of the Arduino’s digital pins to control the LCD. We need to put the Arduino pins in parentheses in this order.
Its function adjusts the pins that the Arduino uses to connect to the LCD. You can use any of Arduino’s digital pins to control the LCD. Put the Arduino pins in parentheses in this order: LiquidCrystal(rs, enable, d4, d5, d6, d7); are LCD pins RS, E, D4, D5, D6, D7.
NOTE: Notice that we refer to the screen as ’lcd’. You can give it a different name if you want, such as “screen”. If you change it, you will need to change the LCD to the new name for the rest of the article.
// added the library:
#include <LiquidCrystal.h>
// LCD definition has been created. Parameters: (RS, E, D4, D5, D6, D7):
LiquidCrystal lcd(12, 11, 4, 5, 6, 7);
For example, suppose you want the LCD pin D7 to be connected to 2 from the Arduino pin. Replace D7 with “7”: LiquidCrystal (RS, E, D4, D5, D6, 12);. In this function we must place it in front of the void setup(); section of the program because we define the pins and if we do not place them at the top, we get an error.
lcd.begin( )
This command adjusts the dimensions of the LCD. We should put it in front of any LiquidCrystal function in the void setup(); section of the program. It must specify the number of rows and columns as lcd.begin(columns, rows);. Through these parameters, we indicate how many rows and how many columns our LCD screen has. On 16x2 LDCs, we need to use lcd.begin(16, 2); or you can use lcd.begin(20, 4); on a 20x4 LCD.
#include <LiquidCrystal.h> // added the library

LiquidCrystal lcd(12, 11, 4, 5, 6, 7); // indicated which pins it was on

void setup() {
  lcd.begin(16, 2); // 16 columns 2 characters, LCD active
}
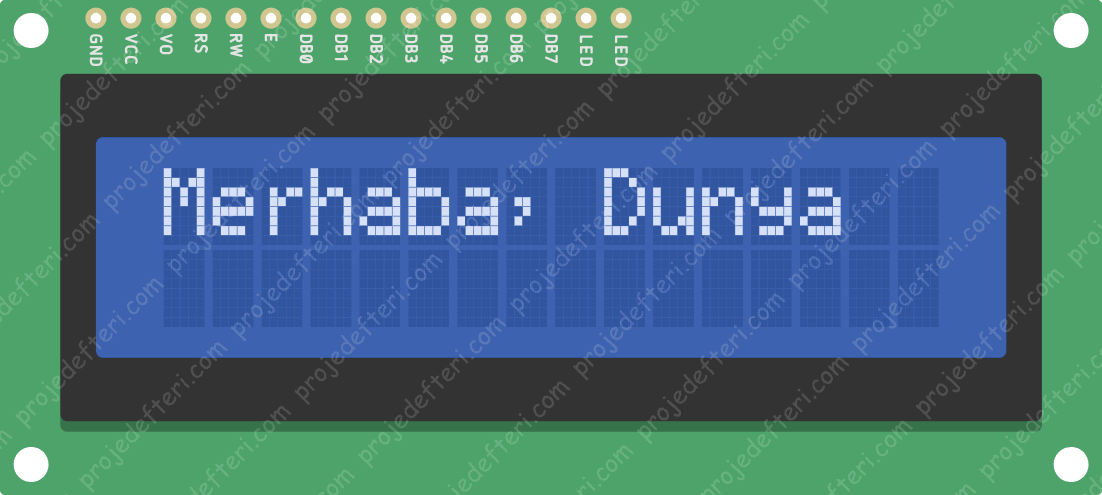
lcd.print("")
This command can be used in the void setup(); or void loop(); section. Prints a message in the first column and row of the LCD screen. Usage: Printed to the screen with lcd.print ("message");. Note that you must put quotation marks ("") around the text. When you want to print numbers or variables, no quotation marks are required. With lcd.print(); it can print numbers in decimal, binary, hexadecimal, and octet bases. Let’s make an example right away:
#include <LiquidCrystal.h> // added the library

LiquidCrystal lcd(12, 11, 4, 5, 6, 7); // indicated which pins it was on

void setup() {
  lcd.begin(16, 2); // 16 columns 2 characters, LCD active
  lcd.print("Merhaba Dunya"); // Merhaba Dunya was written on the screen
}

void loop() {
}
It will look like this on the LCD Screen:
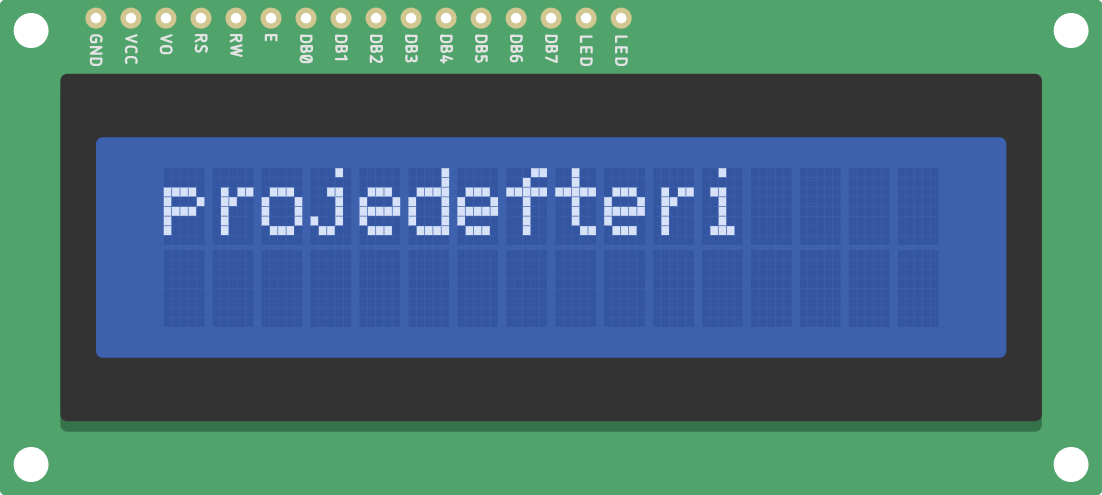
lcd.clear( )
We can use this command in the void setup(); or void loop(); section. Deletes any text or data displayed on the LCD and positions the cursor in the upper-left corner of the screen (first row and first column).
Let’s make a flashing post with what we’ve learned so far.
#include <LiquidCrystal.h> // added the library
LiquidCrystal lcd(12, 11, 4, 5, 6, 7); // indicated which pins it was on
void setup() {
lcd.begin(16, 2); // 16 columns 2 characters, LCD active
}
void loop() {
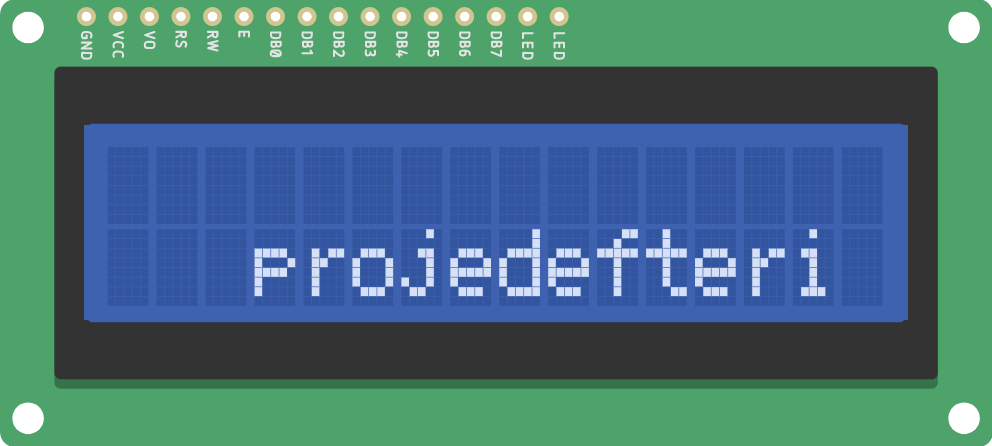
lcd.print("projedefteri"); // projedefteri was written on the screen
delay(500); // waited 500ms
lcd.clear(); // Screen has been cleared
delay(500); // waited 500ms
}
It will look like this on the LCD Screen:
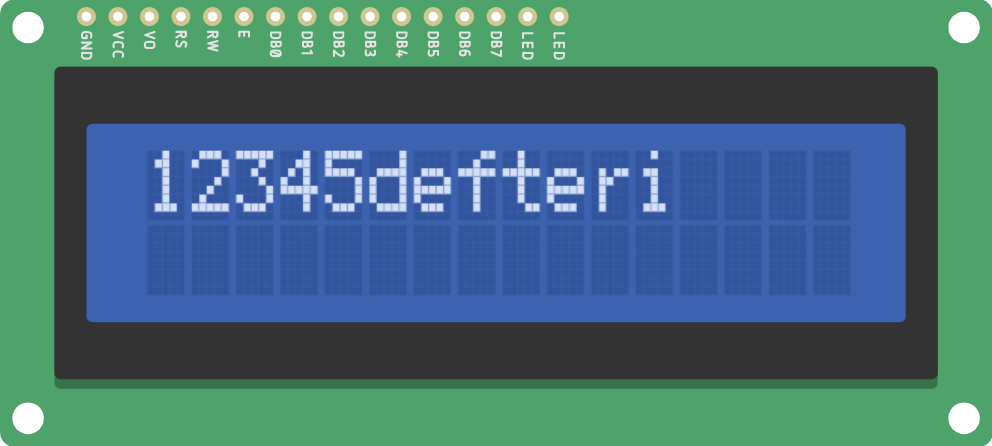
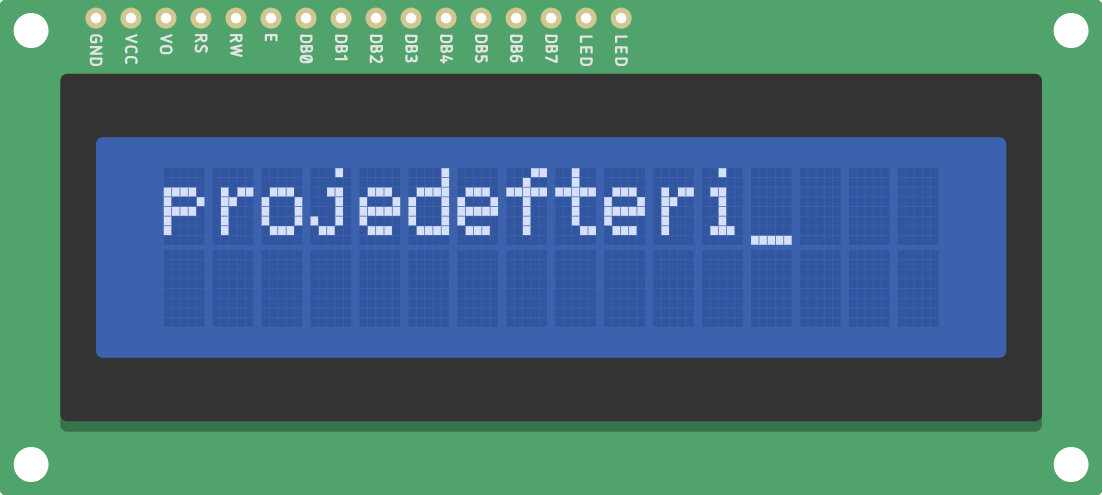
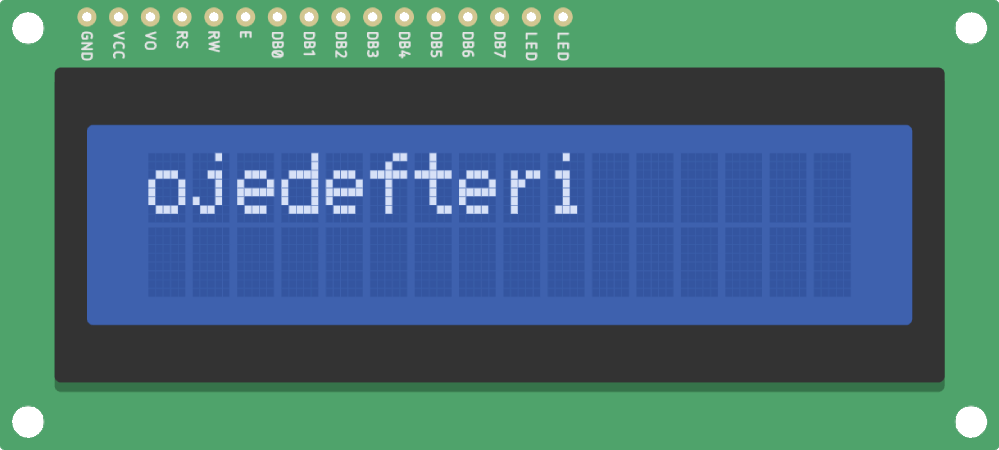
lcd.home( )
This command moves the cursor to row 0 and column 0 of the screen, that is, to the upper-left corner of the screen. If we use lcd.home(); after using the lcd.print(); command, it will overwrite it. For example, let’s write “projedefteri” on the screen and then use the command lcd.home(); and then print “12345” on the screen with lcd.print.
#include <LiquidCrystal.h> // added the library

LiquidCrystal lcd(12, 11, 4, 5, 6, 7); // indicated which pins it was on

void setup() {
  lcd.begin(16, 2); // 16 columns 2 characters, LCD active
}

void loop() {
  lcd.print("projedefteri"); // projedefteri was written on the screen
}

void loop() {
  lcd.home(); // After this command, what we will type will be printed on 0 by 0
  lcd.print("12345"); // wrote 12345 on the screen
}
It will look like this on the LCD Screen:
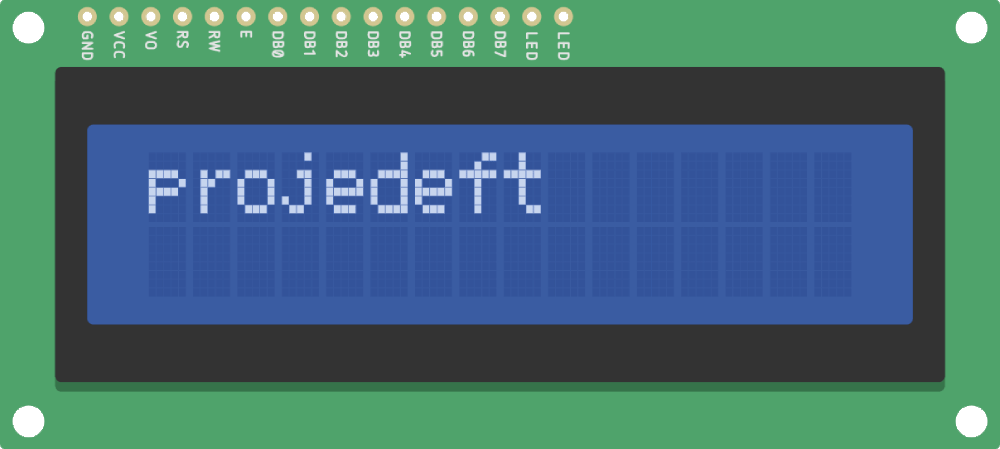
lcd.setCursor( )
This command is used to set the position of the screen cursor. It is similar to the lcd.home(); command, but more useful than lcd.home();. Because this command places the cursor (and any written text, etc.) anywhere on the screen that we want. We can use it in the void setup(); or void loop(); section of the program.
lcd.setCursor(); positions the cursor in the LCD screen cell representing the row and column number that the function takes as a parameter.
The cursor position works with the logic lcd.setCursor(column, row);. The column and row coordinates start from zero and are 0-1 and 0-15 respectively (lcd.setCursor(0-1, 0-15)) For example, let’s print the “projedefteri” by using lcd.setCursor(3, 1); in the void setup(); section of the projedefteri program we did above, sliding the cursor to the bottom row and to the right in the third pixel field.
#include <LiquidCrystal.h> // added the library

LiquidCrystal lcd(12, 11, 4, 5, 6, 7); // indicated which pins it was on

void setup() {
  lcd.begin(16, 2); // 16 columns 2 characters, LCD active
  lcd.setCursor(3, 1); // it was stated that 3 rows would shift to the right and
  1 column would be below
  lcd.print("projedefteri"); // projedefteri was written on the screen
}

void loop() {
}
It will look like this on the LCD Screen:
lcd.cursor( ) & lcd.noCurcor( )
This command makes the cursor visible. The cursor is a horizontal line that comes below the characters after we print it on the LCD. The lcd.noCurcor() command closes the cursor. lcd.Curcor() and lcd.noCurcor() can be used in the void loop() section to split the blinking cursor, similar to what we see in many text input fields. Let’s make a flashing cursor right away.
#include <LiquidCrystal.h> // added the library

LiquidCrystal lcd(12, 11, 4, 5, 6, 7); // indicated which pins it was on

void setup() {
  lcd.begin(16, 2); // 16 columns 2 characters, LCD active
  lcd.print("projedefteri"); // projedefteri was written on the screen
}


void loop() {
  lcd.cursor(); // Cursor is visible
  delay(500); // waited 500ms
  lcd.noCursor(); // Cursor is hidden
  delay(500); // waited 500ms
}
It will look like this on the LCD Screen:
display( ) & noDisplay( )
These commands hide and reappear the text on the screen. The clear(); function serves as a memory, cleaning function, while the noDisplay(); and display(); functions allow the text on the screen to be hidden or visible.
#include <LiquidCrystal.h> // added the library

LiquidCrystal lcd(12, 11, 4, 5, 6, 7); // indicated which pins it was on

void setup() {
  lcd.begin(16, 2); // 16 columns 2 characters, LCD active
  lcd.print("projedefteri"); // projedefteri was written on the screen
}

void loop() {
  lcd.display(); // Turned on the display of what's on the screen
  delay(500); // waited 500ms
  lcd.noDisplay(); // The screens are hidden
  delay(500); // waited 500ms
}
It will look like this on the LCD Screen:
lcd.write( )
You can use this command to print different types of data to the LCD, for example, you can print temperature and humidity information from DHT11, distance from an HCSR-04 sensor, and proximity information to the screen. We can also use it to print special characters that we create ourselves.
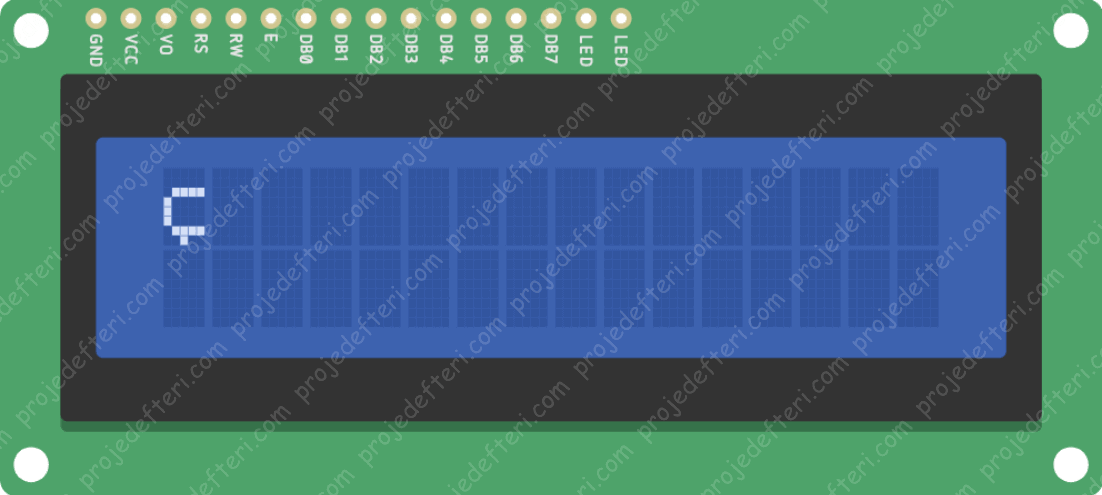
lcd.createChar( )
This command allows us to create our own special characters. Each crankcase of a 16x2 LCD has a width of 5 pixels and a height of 8 pixels. We can define 8 different special characters in a single program. For example, let’s write the letter “ç” as a Turkish character on the screen. If you want to make your own special character, click here.
#include <LiquidCrystal.h> // added the library

LiquidCrystal lcd(12, 11, 4, 5, 6, 7); // indicated which pins it was on

byte harf[8] = { // I stated it to be an 8-bit byte, and it gave this byte the name
  B00000,
  B00000,
  B01111,
  B10000,
  B10000,
  B10000,
  B01111,
  B00100
};

void setup() {
  lcd.begin(16, 2); // 16 columns 2 characters, LCD active
  lcd.createChar(0, harf); // createChar was used to show the character unique to us
  lcd.write((uint8_t)0); // byte typed on the screen
}

void loop() {
}
It will look like this on the LCD Screen:
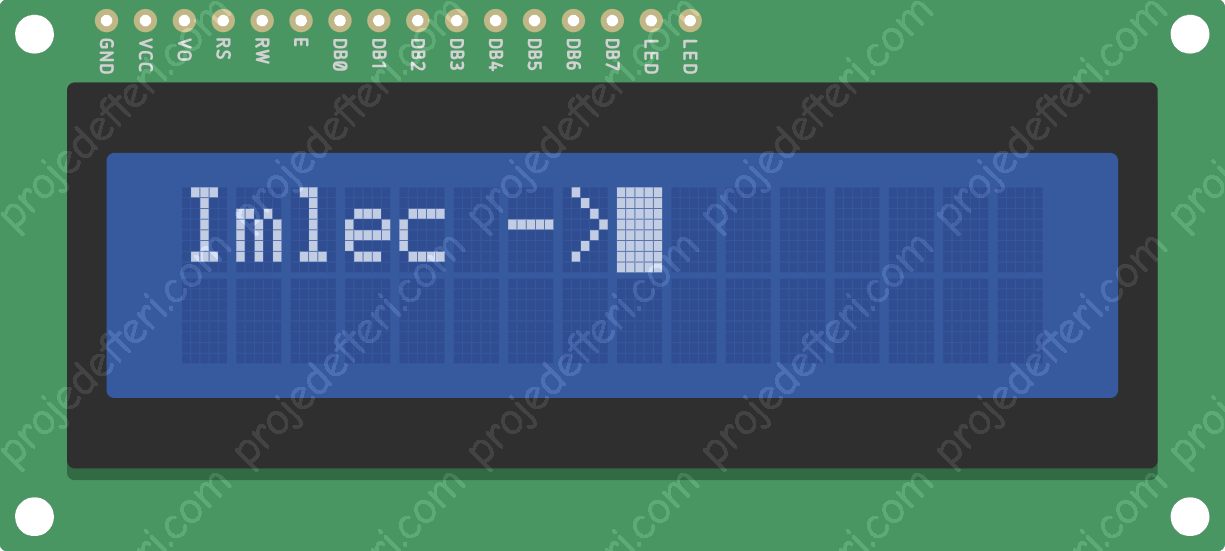
blink( ) & noBlink( )
This command causes the pixel with the cursor to flash and dim approximately once every 500 milliseconds per cycle. It is used in the void loop() field. The lcd.noBlink() command extinguishes the pixel. Let’s make an example right away.
#include <LiquidCrystal.h> // added the library

LiquidCrystal lcd(12, 11, 4, 5, 6, 7); // indicated which pins it was on

void setup() {
  lcd.begin(16, 2); // 16 columns 2 characters, LCD active
  lcd.print("Imlec ->");
  lcd.blink(); // cursor executed
  delay(4000); // waited 4 seconds
  lcd.clear();
  lcd.setCursor(0, 1); // cursor position 2nd row column 1
  lcd.noBlink(); // cursor closed
  lcd.print("Imlec ->");
  delay(2000); // waited 2 seconds
  lcd.clear(); // screen has been cleared
}

void loop() {
}
It will look like this on the LCD Screen:
lcd.scrollDisplayLeft( )
This command takes everything we print to the LCD and moves it to the left. We should then use it in the void loop () section with a delay command. The command moves the text 40 fields to the left before returning to the first character. This code moves the text “projedefteri” to the left, one second per character. Let’s see it immediately with a sample code.
#include <LiquidCrystal.h> // added the library

LiquidCrystal lcd(12, 11, 4, 5, 6, 7); // indicated which pins it was on

void setup() {
  lcd.begin(16, 2); // 16 columns 2 characters, LCD active
  lcd.print("projedefteri"); // projedefteri was written on the screen
}

void loop() {
  lcd.scrollDisplayLeft(); // scroll from right to left
  delay(100); // waited 100ms
}
It will look like this on the LCD Screen:
lcd.scrollDisplayRight( )
This command behaves like lcd.scrollDisplayLeft() but moves the text to the right.
#include <LiquidCrystal.h> // added the library

LiquidCrystal lcd(12, 11, 4, 5, 6, 7); // indicated which pins it was on

void setup() {
  lcd.begin(16, 2); // 16 columns 2 characters, LCD active
  lcd.print("projedefteri"); // projedefteri was written on the screen
}

void loop() {
  lcd.scrollDisplayRight(); // scroll from left to right
  delay(100); // waited 100ms
}
It will look like this on the LCD Screen:
lcd.autoscroll( )
This command takes a sequence of text and scrolls from right to left in increments of the series’ character count. For example; If you have a 3-character text array, 3 fields will move the text to the left in each step:
#include <LiquidCrystal.h> // added the library

LiquidCrystal lcd(12, 11, 4, 5, 6, 7); // indicated which pins it was on

void setup() {
  lcd.begin(16, 2); // 16 columns 2 characters, LCD active
}

void loop() {
  lcd.setCursor(0, 0); // position of the row and column is specified.
  lcd.autoscroll(); // automatic scrolling turned on
  lcd.print("proje"); // wrote proje on the screen
  delay(200); // 200ms waited
  lcd.setCursor(0, 1); // position of the row and column is specified.
  lcd.print("defteri"); // wrote defteri on the screen
  delay(400); // 400ms waited
}
It will look like this on the LCD Screen:
lcd.noAutoscroll( )
lcd.noAutoscroll() turns off the function lcd.autoscroll(). You can use this function before or after the lcd.autoscroll() function in the void loop() section to create floating text or animated sequences.
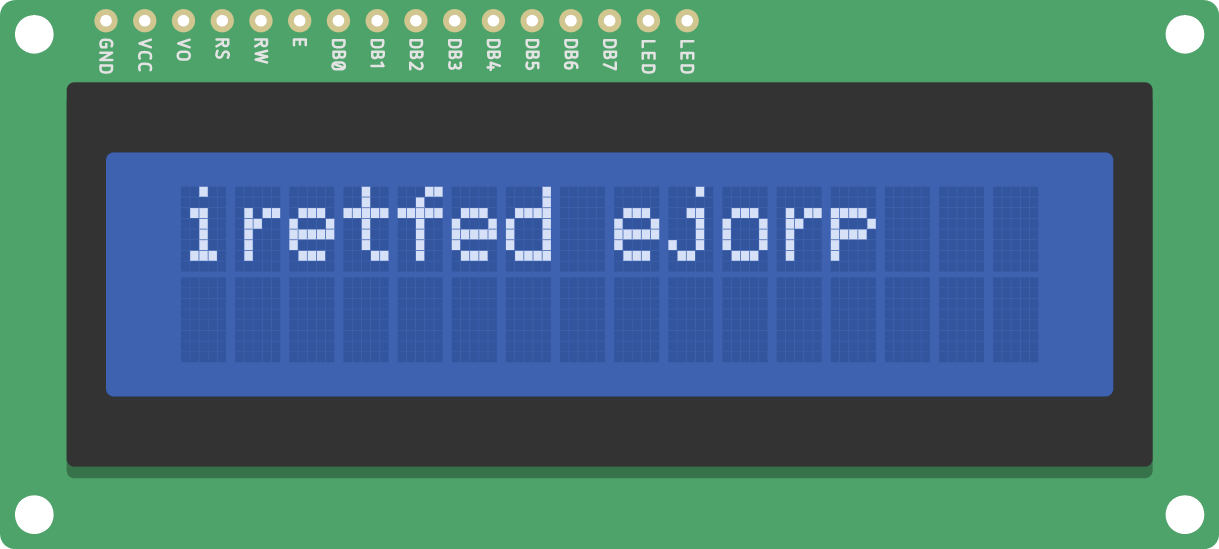
lcd.rightToLeft( )
This command allows us to set the direction in which it printed the text on the screen. The default mode is from left to right using the command lcd.leftToRight(), but you can use this command if you want to write the text in the opposite direction, as in the example below.
#include <LiquidCrystal.h> // added the library

LiquidCrystal lcd(12, 11, 4, 5, 6, 7); // indicated which pins it was on

void setup() {
  lcd.begin(16, 2); // 16 columns 2 characters, LCD active
  lcd.setCursor(12, 0);
  lcd.rightToLeft(); // it was stated that it would be from right to left
  lcd.print("proje defteri"); // proje defteri was written on the screen
}

void loop() {
}
It will look like this on the LCD Screen:
Using the 16x2 LCD Screen Online
You can run it online from below. 😊 If you want to edit and modify it yourself, you can click here. 😉
Closing 🙌🏻
I hope it has been a useful blog for you, useful. 🙂 I have a request from you, by sharing and commenting on your thoughts in the “What do you think?” section below, 😀 I can both support me and make it possible for you to reach more people and learn your opinion. 😊 The most up-to-date, almost all sources have created a giant blog by researching. It’s been a blog that I’ve been doing and writing for months… I’m glad I was able to help! Safely… 🥰